Eager to infuse your JavaScript app with state-of-the-art AI? This comprehensive tutorial will show you how to embed ChatGPT, the titan of large language models, into your JavaScript code. Get ready to revolutionize your app's interactivity with natural language processing capabilities.
First, follow these steps to integrate ChatGPT into JavaScript
To use the ChatGPT language model in JavaScript, you make use of the OpenAI API library. Here are the steps to follow:
- First, sign up for OpenAI API access at https://beta.openai.com/signup/. Once you’ve signed up, you’ll get an API key to use to authenticate your requests.
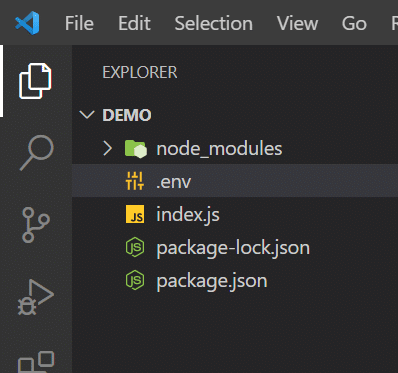
- Create an empty folder on your computer named "Demo" and open it in an editor like VS Code to create the initial
package.jsonfile in it by writing the below command in the VS Code terminal:npm init -y - To use the OpenAI API in your JavaScript application, you have to install the
openaipackage using the following command in the terminal:npm install openai - Next, install the
.envpackage, which is a zero-dependency module that loads environment variables from a.envfile intoprocess.env. It allows you to separate sensitive data from your code and store it in a file that is not tracked by version control systems. You will use this to store your OpenAI API key. - Now create two files:
index.js, where you’ll write your code, and an.envfile, where you will store your API key. This is how your project structure should look:
- In the
.envfile, add the OpenAPI key obtained in step 1 by creating an environment variable calledOPENAI_API_KEY.OPENAI_API_KEY=' Write Your API KEY here'
That’s it! With setup complete, it's time to code.
Now unleash the AI
- Import the necessary modules into your JavaScript file
index.js.const { Configuration, OpenAIApi } = require("openai"); require('dotenv').config()Here, you're importing the
ConfigurationandOpenAIApimodules from theopenaipackage and theconfigfunction from the.envpackage. - Now, you need to create a configuration object to authenticate your requests using your OpenAI API key. Add the following code to
index.js:const configuration = new Configuration({ apiKey: process.env.OPENAI_API_KEY, }); const openai = new OpenAIApi(configuration);At this step, you're creating a
new Configurationobject and passing your OpenAI API key as a parameter to theapiKeyproperty. You're then creating a newOpenAIApiobject using the configuration object. - You can now use the
openaiobject to generate responses to prompts. Here's a quick example:async function runCompletion () { const completion = await openai.createCompletion({ model: "text-davinci-003", prompt: "How are you today?", max_tokens:4000 }); console.log(completion.data.choices[0].text); } runCompletion();
Here, you’ve created an asynchronous method called runCompletion() that uses the openai object to generate a response to the prompt "How are you today?" using the text-davinci-003 model. See the differences between the models. The max_tokens parameter set at 4000 refers to the maximum length of a response you want. See how tokens are counted. You're then logging the response to the console.
Here is the full example code:
const { Configuration, OpenAIApi } = require("openai");
require('dotenv').config()
const configuration = new Configuration({
  apiKey: process.env.OPENAI_API_KEY,
});
const openai = new OpenAIApi(configuration);
async function runCompletion () {
    const completion = await openai.createCompletion({
    model: "text-davinci-003",
    prompt: "How are you today?",
    max_tokens:4000
    });
    console.log(completion.data.choices[0].text);
}
runCompletion();
The above code is run by writing the following command in the terminal:
node index.js
You get the below response from ChatGPT when running this terminal command:
![]() ChatGPT’s Response:
ChatGPT’s Response:
I'm doing well, thanks for asking. How about you?
Congrats! You’ve integrated ChatGPT with JavaScript using the OpenAI API.
It’s important to note that although ChatGPT is magical, it does not have human-level intelligence. Responses shown to your users should always be properly vetted and tested before being used in a production context. Don’t expect ChatGPT to understand the physical world, use logic, be good at math, or check facts.
Handling errors from the ChatGPT API
It's a best practice to monitor exceptions that occur when interacting with any external API. For example, the API might be temporarily unavailable, or the expected parameters or response format may have changed and you might need to update your code, and your code should be the thing to tell you about this. Here's how to do it with Rollbar:
First install using the node package manager, npm:
npm install --save rollbar
Next, setup the Rollbar configuration (Example using Express):
var express = require('express');
var Rollbar = require('rollbar');
var rollbar = new Rollbar('POST_SERVER_ITEM_ACCESS_TOKEN');
var app = express();
app.get('/', function(req, res) {
// ...
});
// Use the rollbar error handler to send exceptions to your rollbar account
app.use(rollbar.errorHandler());
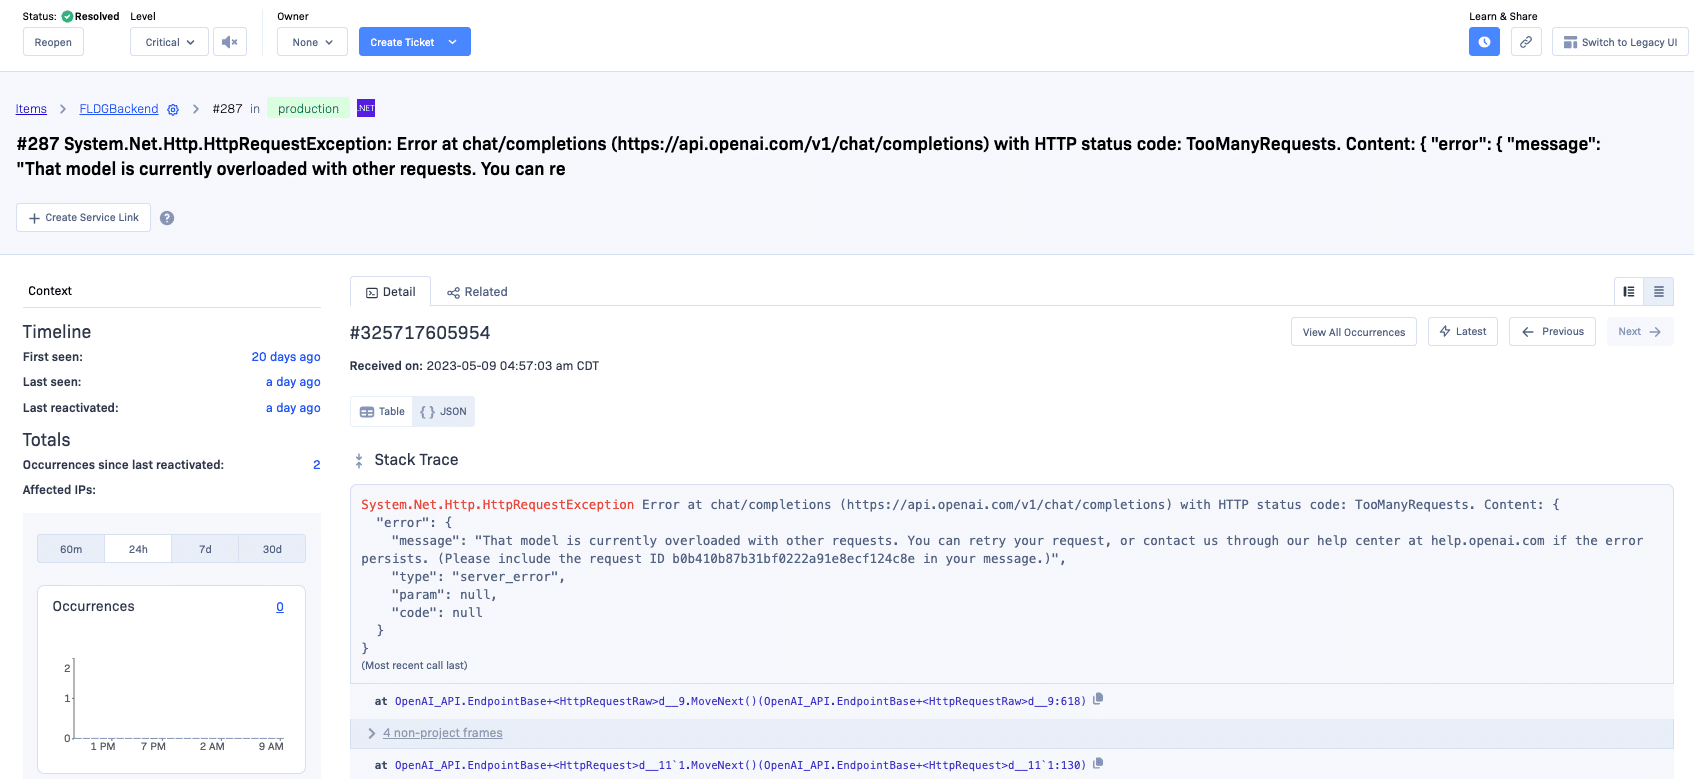
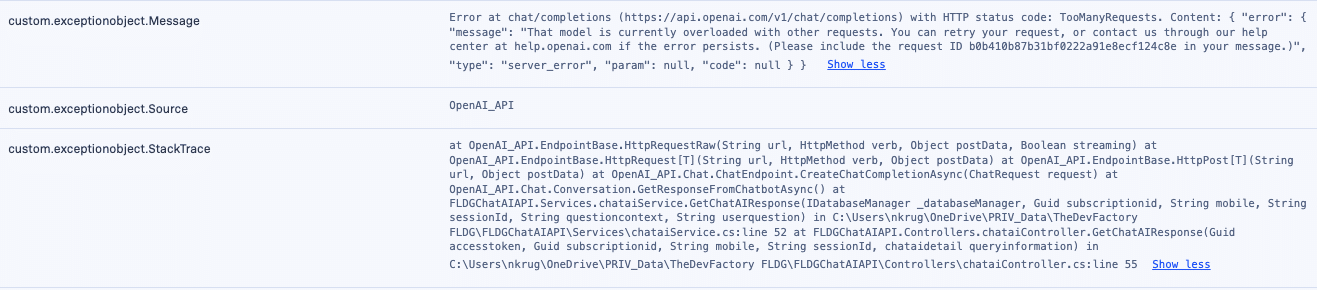
app.listen(6943);Example of ChatAI API Error:
(Caught by Rollbar)
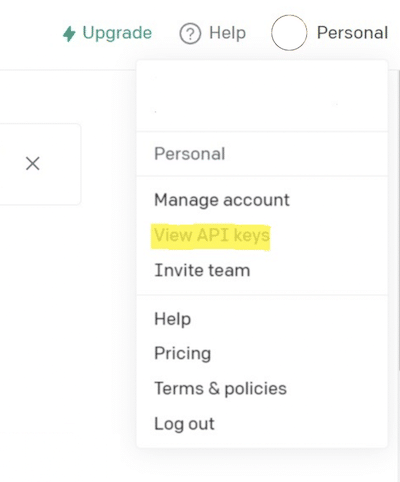
To get your Rollbar access token, sign up for free and follow the instructions for JavaScript.
We can't wait to see what you build with ChatGPT. Happy coding!