Continuous delivery (CD) helps reduce the cost, time and risk of delivering changes by allowing for fast incremental updates to applications in production. However, it’s essential to monitor your application after each deployment. You need to be notified immediately if something is wrong or users are having a poor experience.
Rollbar is a leading solution for error monitoring in the software development lifecycle. It alerts you when new errors occur after a deployment. It can also tell you which deployment the error was first seen in, and which code changes were likely responsible. This can dramatically speed up your troubleshooting time and help you fix problems faster.
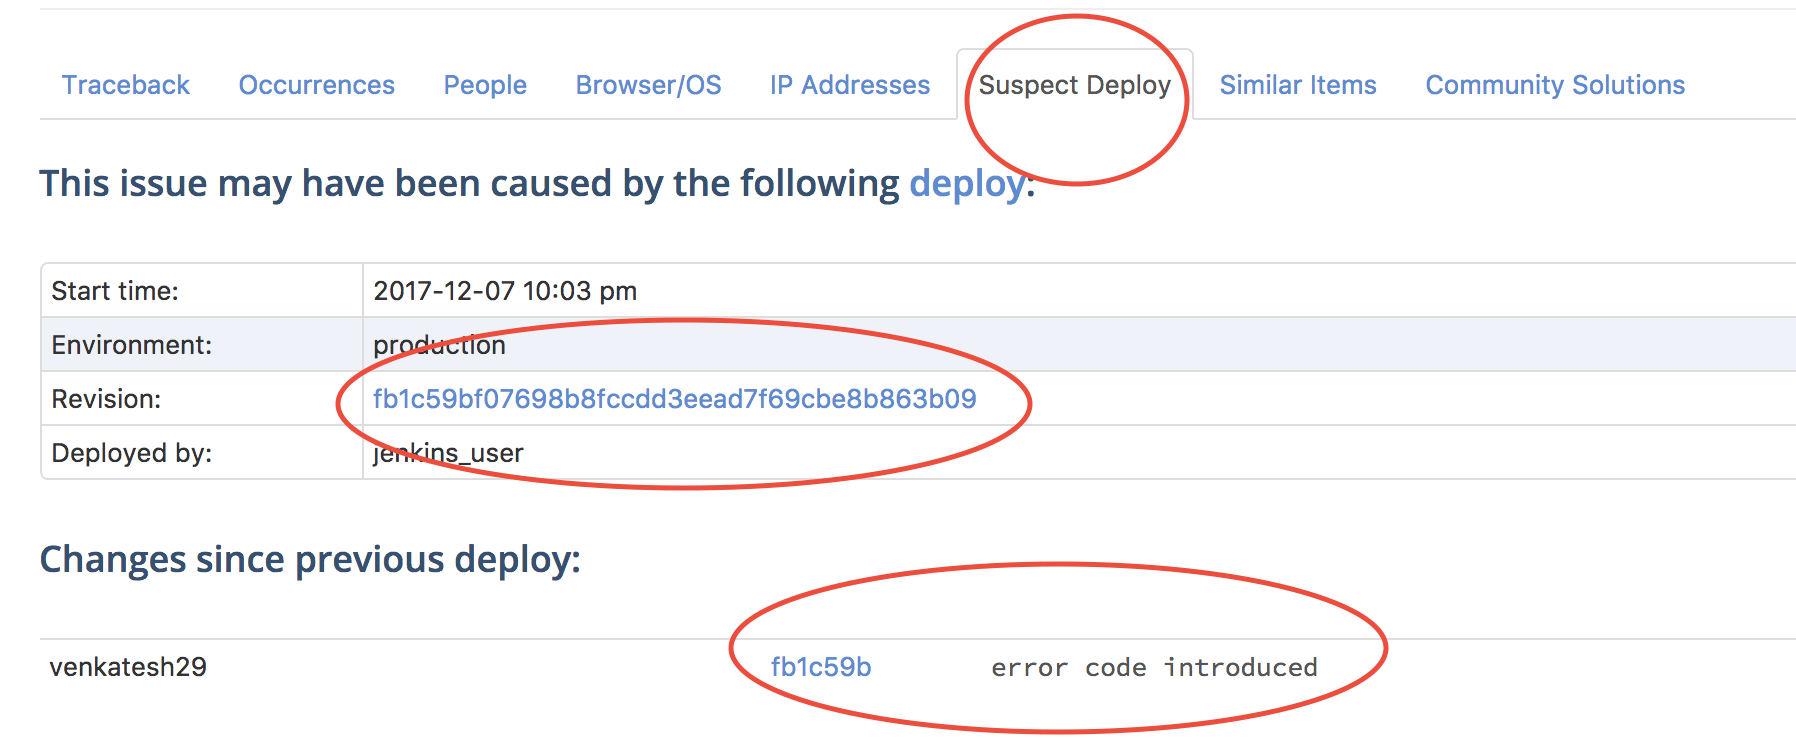
In the screenshot above, you can see that Rollbar has automatically identified the suspected deployment where the error was first seen (indicated by the second red circle). Additionally, it has identified the code change where the error was introduced (indicated by the third red circle). You can click on these links to go straight to the code change in GitHub or Bitbucket.
Jenkins is a popular open source server to automate continuous integration and continuous delivery. We'll show you how to configure Jenkins to notify Rollbar when a new version is deployed. Then, Rollbar will tell you the suspected deployment for each error.
Our pet clinic example
Rollbar and Jenkins should work with pretty much all applications but we chose the Java pet clinic project to demonstrate the integration capabilities. It is freely available and simple to run or modify. The source code is available on the spring-petclinic-angularjs repository on GitHub. Once you understand the example, you should try setting up your own application.
The pet clinic application is a Java and open source Spring Boot application. It depicts the functionality of a pet clinic with simple REST resources or entities like Pet, Owner, Visits, etc. The application consists of an AngularJS front-end UI module and a back-end REST API module. You need to have basic Java knowledge and don’t need to know AngularJS or Spring Boot technologies to complete this tutorial.
To demonstrate error monitoring, we will add a URL to the pet clinic that throws an error. We'll then show you how to trigger the error, view it in Rollbar, and identify the suspected change.
Integrate Jenkins with Rollbar
First, we are going to show you how to set up Jenkins for our pet clinic application. Then we are going to send deployment notifications to Rollbar so it can track when deployments are made.
Set up the Jenkins application
Step 1:
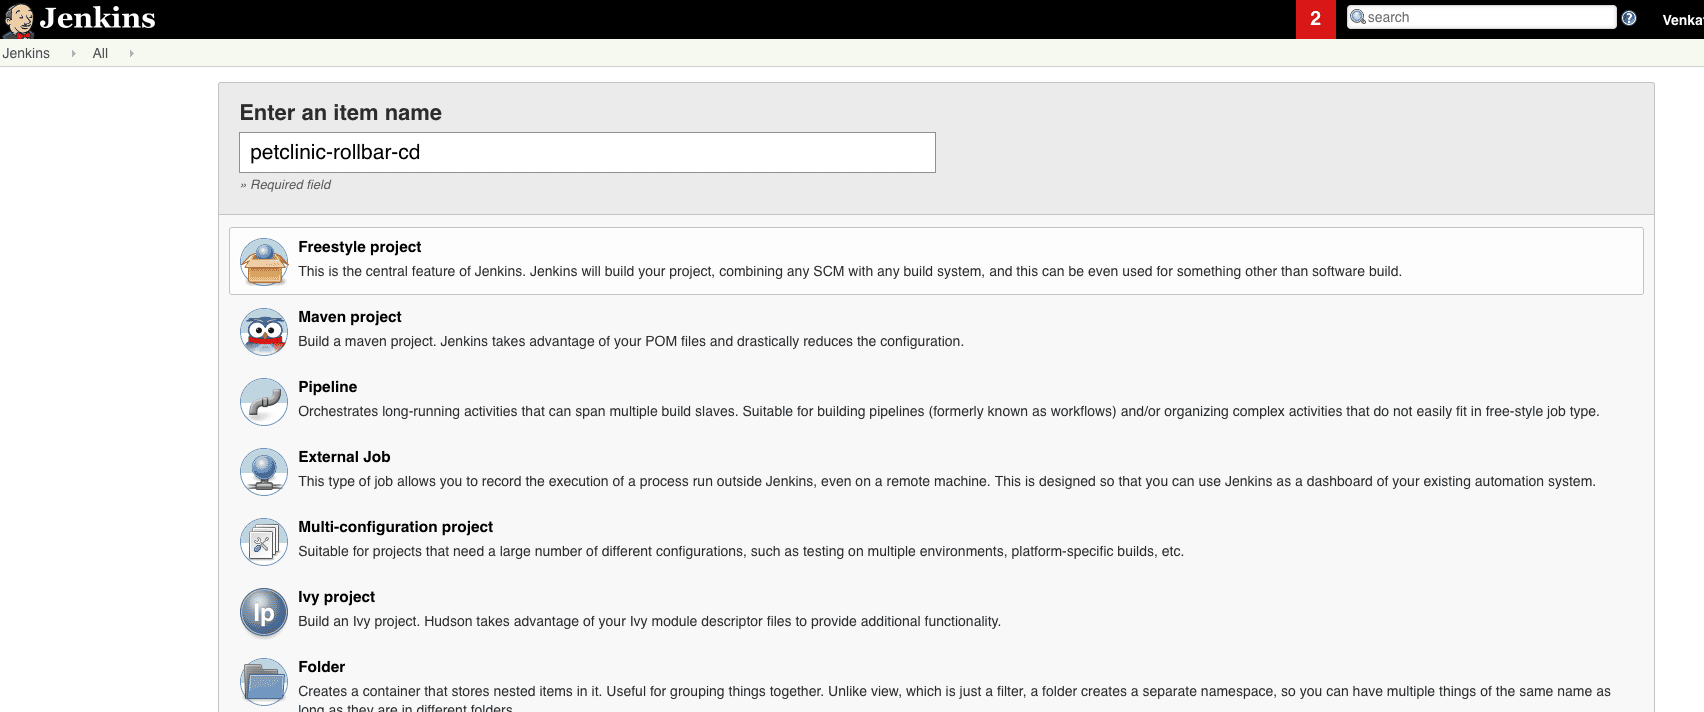
Create a Jenkins job for a project of your choice (we'll pick freestyle project for our example).
Step 2:
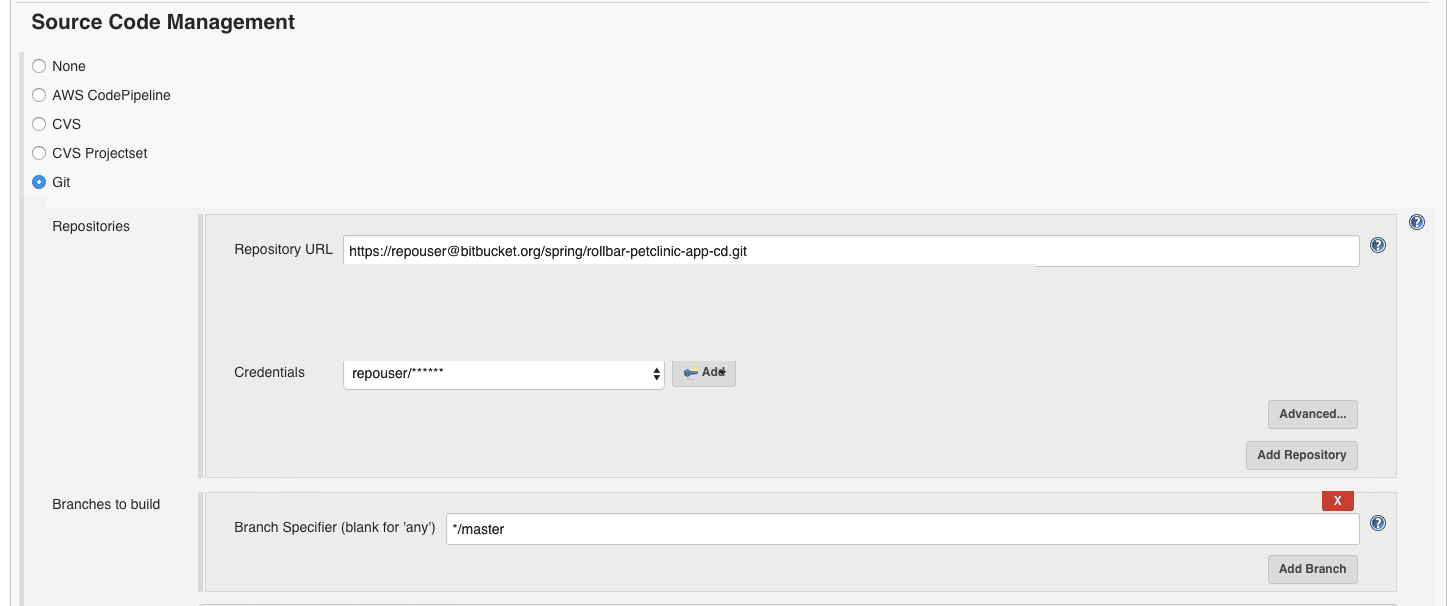
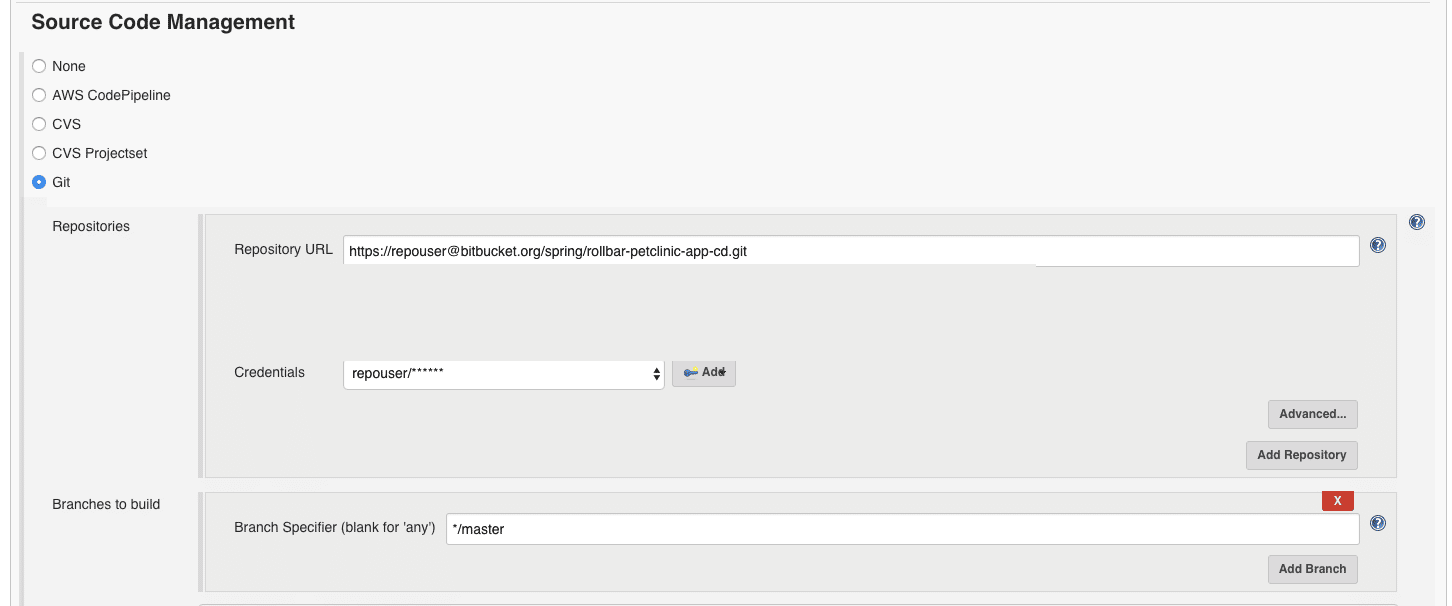
Configure your source code repository such as git or Bitbucket so that Jenkins has credentials to pull the code and build the project. Add the URL where Jenkins can pull the latest code.
Step 3:
Add the following scripts to build and deploy the service into the Jenkins server.
mvn clean package
sudo chmod 777 spring-petclinic-server/target
cd  spring-petclinic-server/target
java -jar petclinic-*.jar  & echo $! > ./pid.file &
The script will build the repository and package the jar file with Maven, then deploy it to the Jenkins server. (Advanced users: You can also deploy it to your choice of server but change the APIs in the scripts accordingly.) The successful deployment writes the process ID into the pid.file which can be used later to stop the process.
Send deployment notifications to Rollbar
Once the application build and deployment is successful, it is time to notify Rollbar of the successful deployment along with the deployed version. Rollbar can distinguish the code changes between the revisions of the deployments, and in the case of errors, it points to the newly introduced code for error resolution. It also points to the suspected deployment revision under the error.
Rollbar provides a RESTful deploy notification API to notify the deployments to Rollbar from any source using a simple REST service call. Please refer to the documentation to know more about this deploy API.
Add another build step to notify Rollbar after deployment of the service. Refer to the description on the input parameters below.
- access_token: The destination project token on Rollbar. This token gets generated when a project is created on Rollbar.
- environment: The deployment environment where the service is deployed. We can configure different environments such as development, staging and production.
- revision: The deployed application version. This can be the jenkins BUILD_NUMBER, Maven project artifact version, or repository commit ID. Rollbar will create a link to the repository commit source code if the supplied version is the commit ID.
- local_username: The user who deployed the build to server.
echo 'Notifying Rollbar of deployment and build version'
curl https://api.rollbar.com/api/1/deploy/ \
  -F access_token=obce2f27e4b84332b7873ce78ecb8f86 \
  -F environment=production \
  -F revision=${GIT_COMMIT} \
  -F local_username=jenkins_user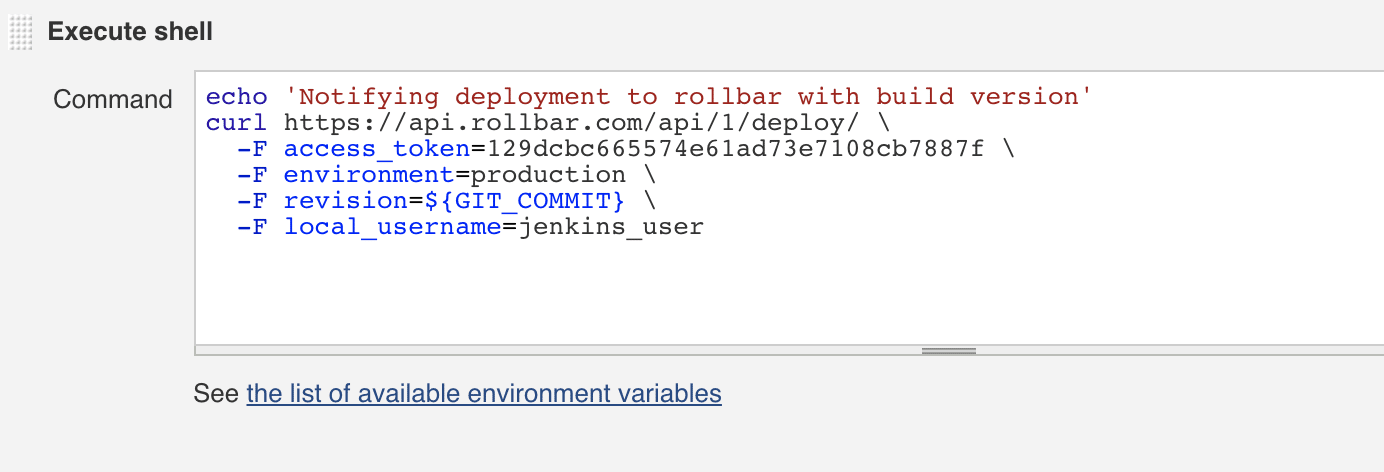
Rollbar now shows the deployment version history.
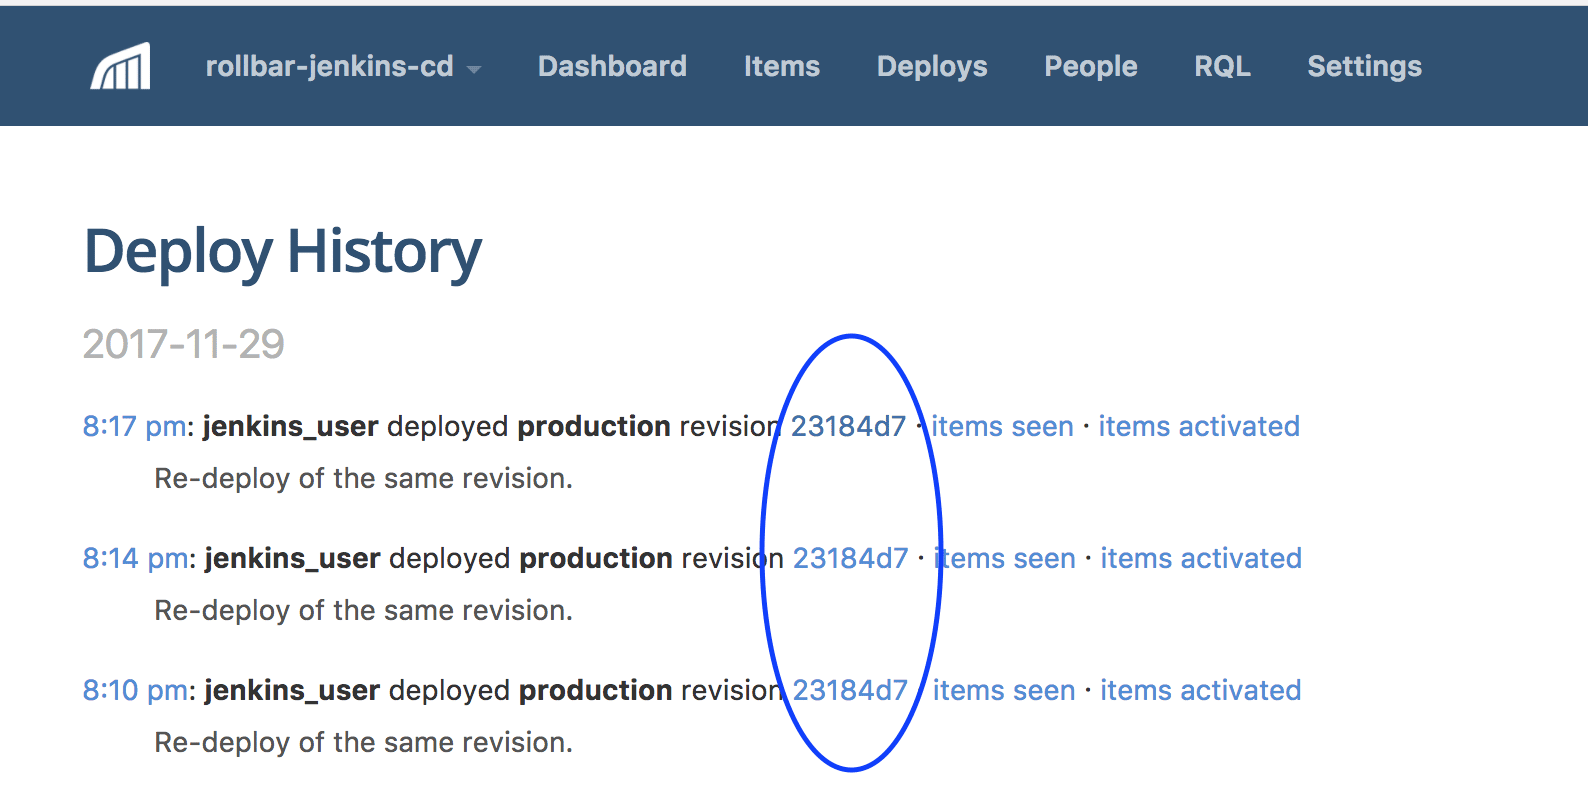
The revision number will be a link to repository source code pointing to the commit revision, as shown in the picture below. The revision is circled in blue.
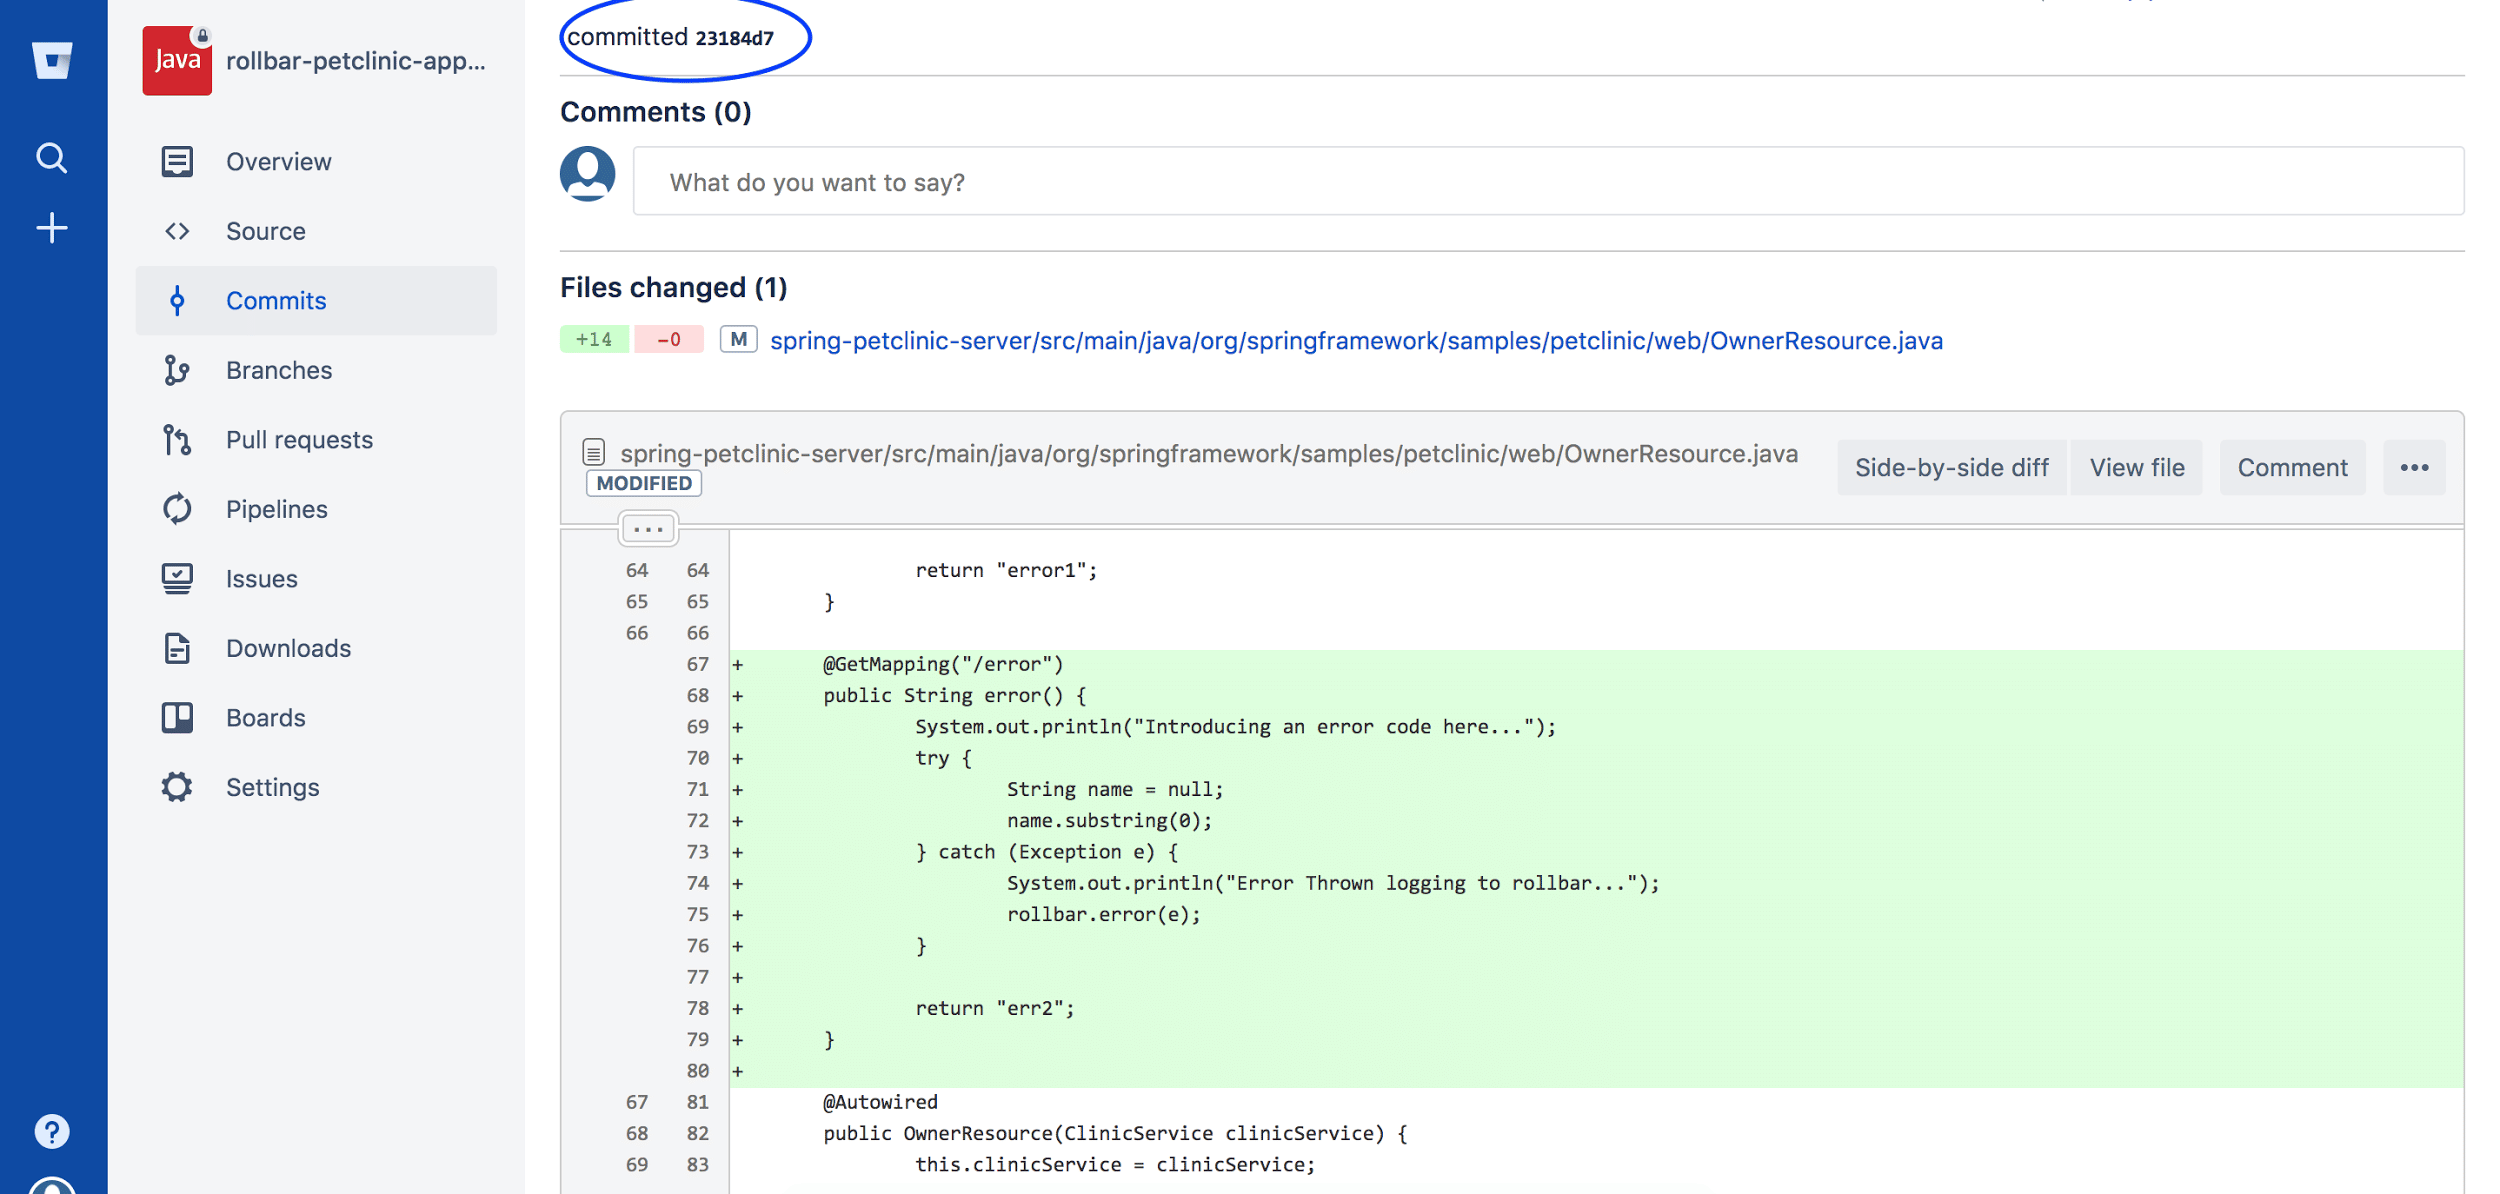
We have successfully set up continuous delivery with Jenkins and are now sending deploy notifications to Rollbar.
Integrate your app with Rollbar
In previous sections, we learned how to set up the continuous delivery job and integrate with Rollbar. Now we will learn how to integrate the pet clinic application with Rollbar to monitor application errors. If handled or unhandled exceptions are thrown in the application, we will catch them and notify Rollbar with details about the error.
Add the Rollbar notifier SDK
Step 1:
Prerequisites:
- Create an account with Rollbar https://rollbar.com.
- Create your project and select Java from the list of notifiers.
- Select the server side access token that is generated when the project is created.
Step 2:
Add a Maven dependency in the pom.xml file for the Rollbar-web notifier in the project.
<dependencies>
  <dependency>
    <groupId>com.rollbar</groupId>
    <artifactId>rollbar-web</artifactId>
    <version>1.0.0</version>
  </dependency>
</dependencies>
For Java based applications, Rollbar provides various other modes of integration inlz. For more information please visit Rollbar’s Java documentation.
Step 3:
We will create a custom utility class called ServerProvider which extends a Provider interface from the Rollbar library. The ServerProvider class provides a Rollbar ecosystem to look up and link classes with errors, including the source branch and version that caused the error and the base package of the source code. In the code snippet below, the root is the base package path where the source code is located.
Source Code:
public class ServerProvider implements Provider<Server> {
  @Override
  public Server provide() {

    return new Server.Builder().branch("master")
              .root("org.springframework.samples.petclinic")
              .build();
  }
}
Note: When the root is provided, Rollbar will give a link on the class name in the error traceback to the class in your source code repository. This will save you time because you don’t have to navigate your source code to find the location yourself.
Step 4:
We will be using the rollbar-web package to notify Rollbar of errors. Let’s start with the OwnerResource which creates a REST interface for managing a pet owner. To track errors in Rollbar we need to configure it with our access token and the ServerProvider we just created. To test it, we can trigger an error with a method throwError() method as shown below. When the arithmetic exception is thrown, the catch block will handle the exception and notify Rollbar with a rollbar.error(e) method call.
@RestController
public class OwnerResource extends AbstractResourceController {

  private static Rollbar rollbar = null;
  static {
    ConfigBuilder configBuilder = withAccessToken(ROLLBAR_SERVER_ACCESS_TOKEN);

    Config config =configBuilder.environment("production")
                      .handleUncaughtErrors(true)
                      .server(new ServerProvider()).build();
    rollbar = new Rollbar(config);
  }

  @GetMapping("/throwerror")
  public String throwError() {
    System.out.println("Introducing an error code here...");
    try {
      Int sum = 0;
      int avg = 1234 / sum;
    } catch (Exception e) {
      System.out.println("Error Thrown notifying to rollbar...");
      rollbar.error(e);
    }
  return "error-thrown";
  }
}
Add source control integration
Now, we would like Rollbar to integrate with our source control repository so that when an error occurs, it can automatically link us to the proper line of code. It can also tell us when there are code changes that break the deployment.
Step 5:
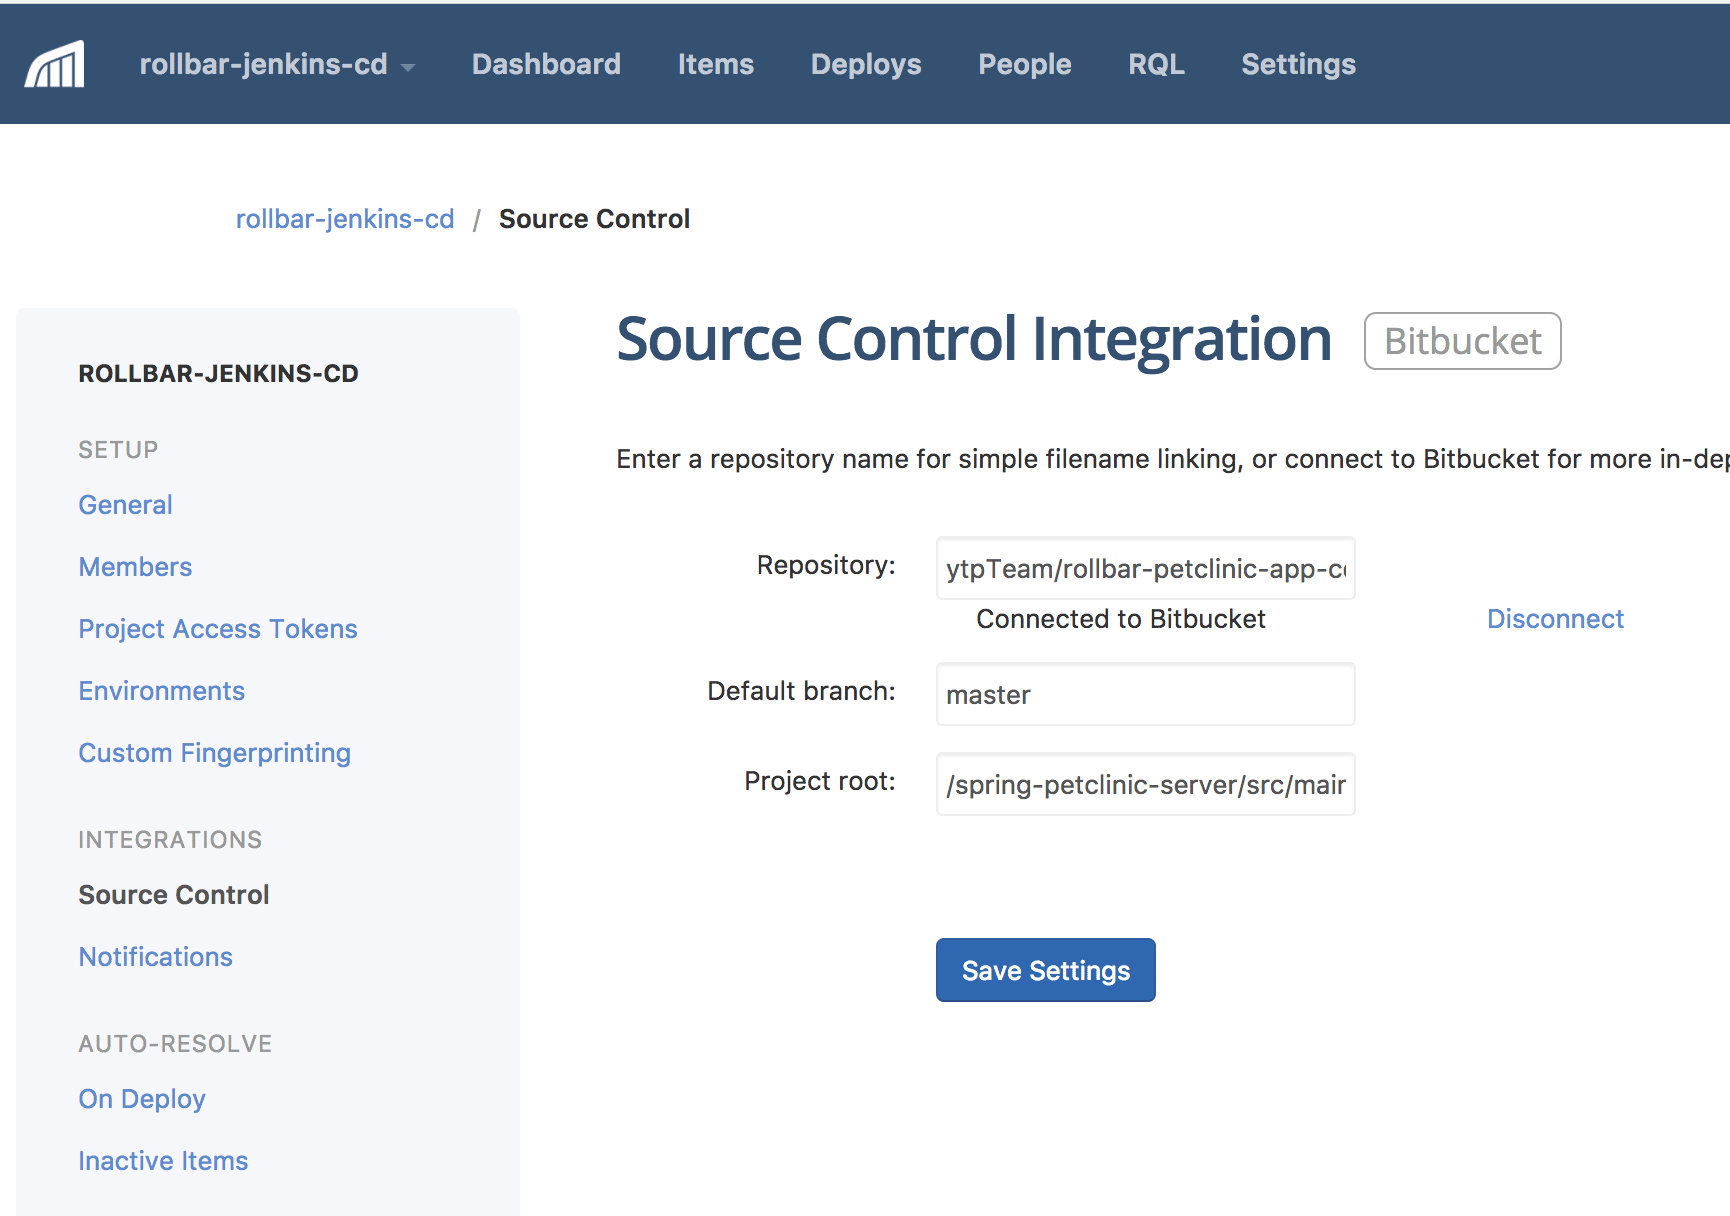
Make sure to have the project root configured in Rollbar as shown below during the project integration with SCM; it’s the source code location where the Java root packages are placed. If this is not configured properly, Rollbar will not be able link the source code to an error. In this example, the project root is /spring-petclinic-server/src/main/java.
Step 6:
Enable the Rollbar integration plugin or add-on in your source repository. For Bitbucket, it will be under account -> integrations -> rollbar -> add.

Step 7:
Make sure the pet clinic project is built locally and tests are running. Then, commit changes to the source repository to begin the CD process.
Run the test cases to generate errors
Now we will test all the pieces that we just put together. We will execute our build on Jenkins, run the application, then generate a test error.
Log in to the Jenkins server or the server where you deployed the application and stop the Spring Boot process. In the earlier steps we started the pet clinic service using Jenkins, which needs to be stopped before re-deploying the new revision of the code. Otherwise, the service will not be able to start when another process is already using the same port (8080).
pkill -f ‘java -jar petclinic*’After the application restarts, you can generate the error using the curl command from your terminal:
curl http://localhost:8080/throwerrorThat’s it! You just generated your first error.
Quickly find the root cause of errors
Check the Rollbar dashboard for the error logging on the Items menu tab which will show the error details along with the link to the source code file that caused the error. The error will show the suspected deployment version along with the piece of code causing the error as well as the code checked-in user and a hyperlink to source code on the Bitbucket.
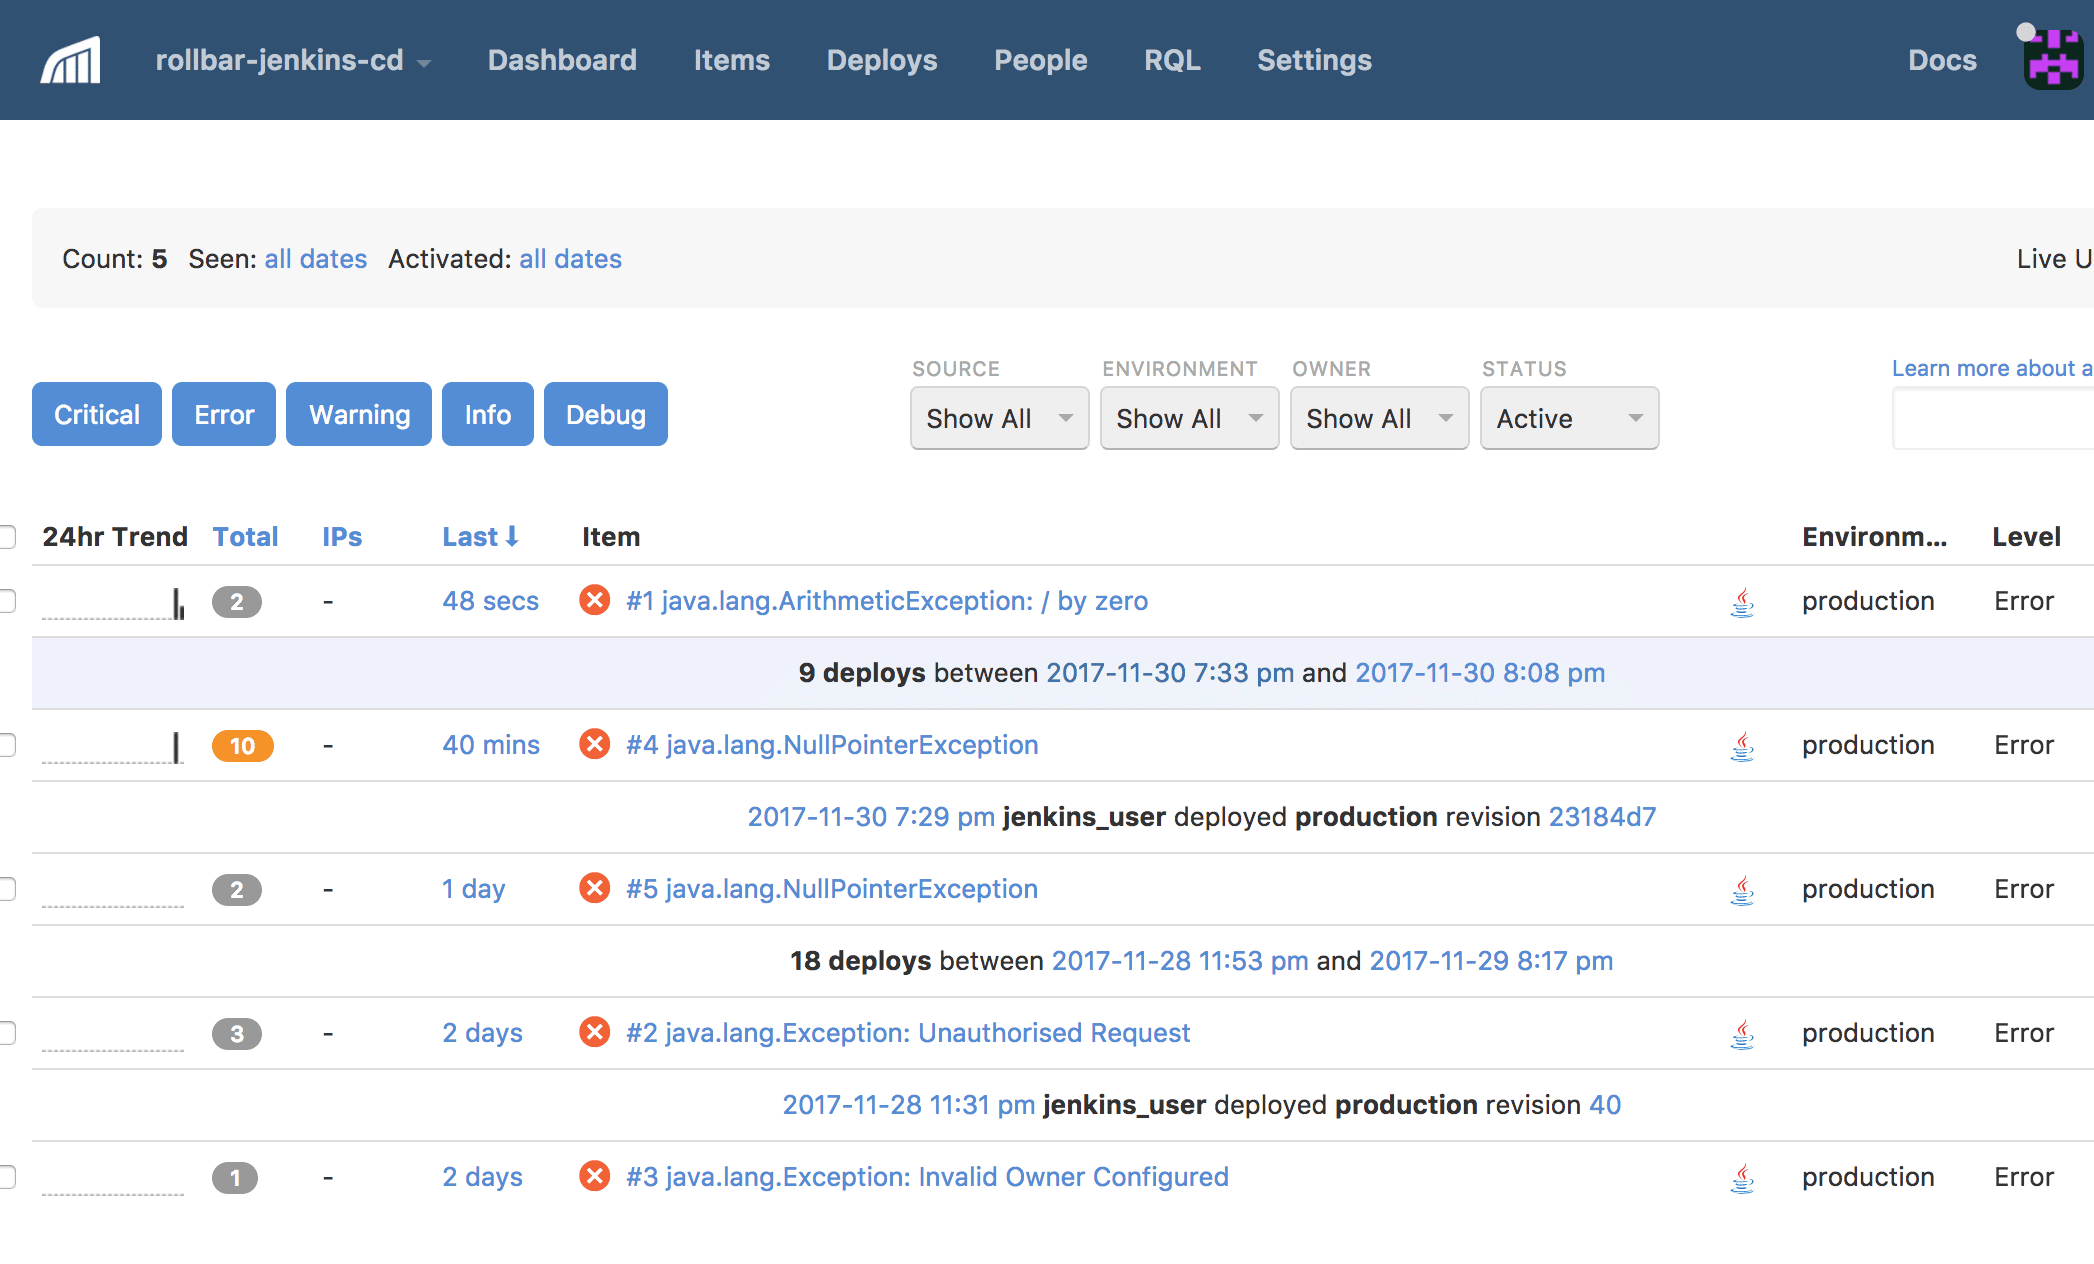
Clicking on an error item in the list, we see the item detail page. Next to the trace back, we can see a link to the source code causing the error.
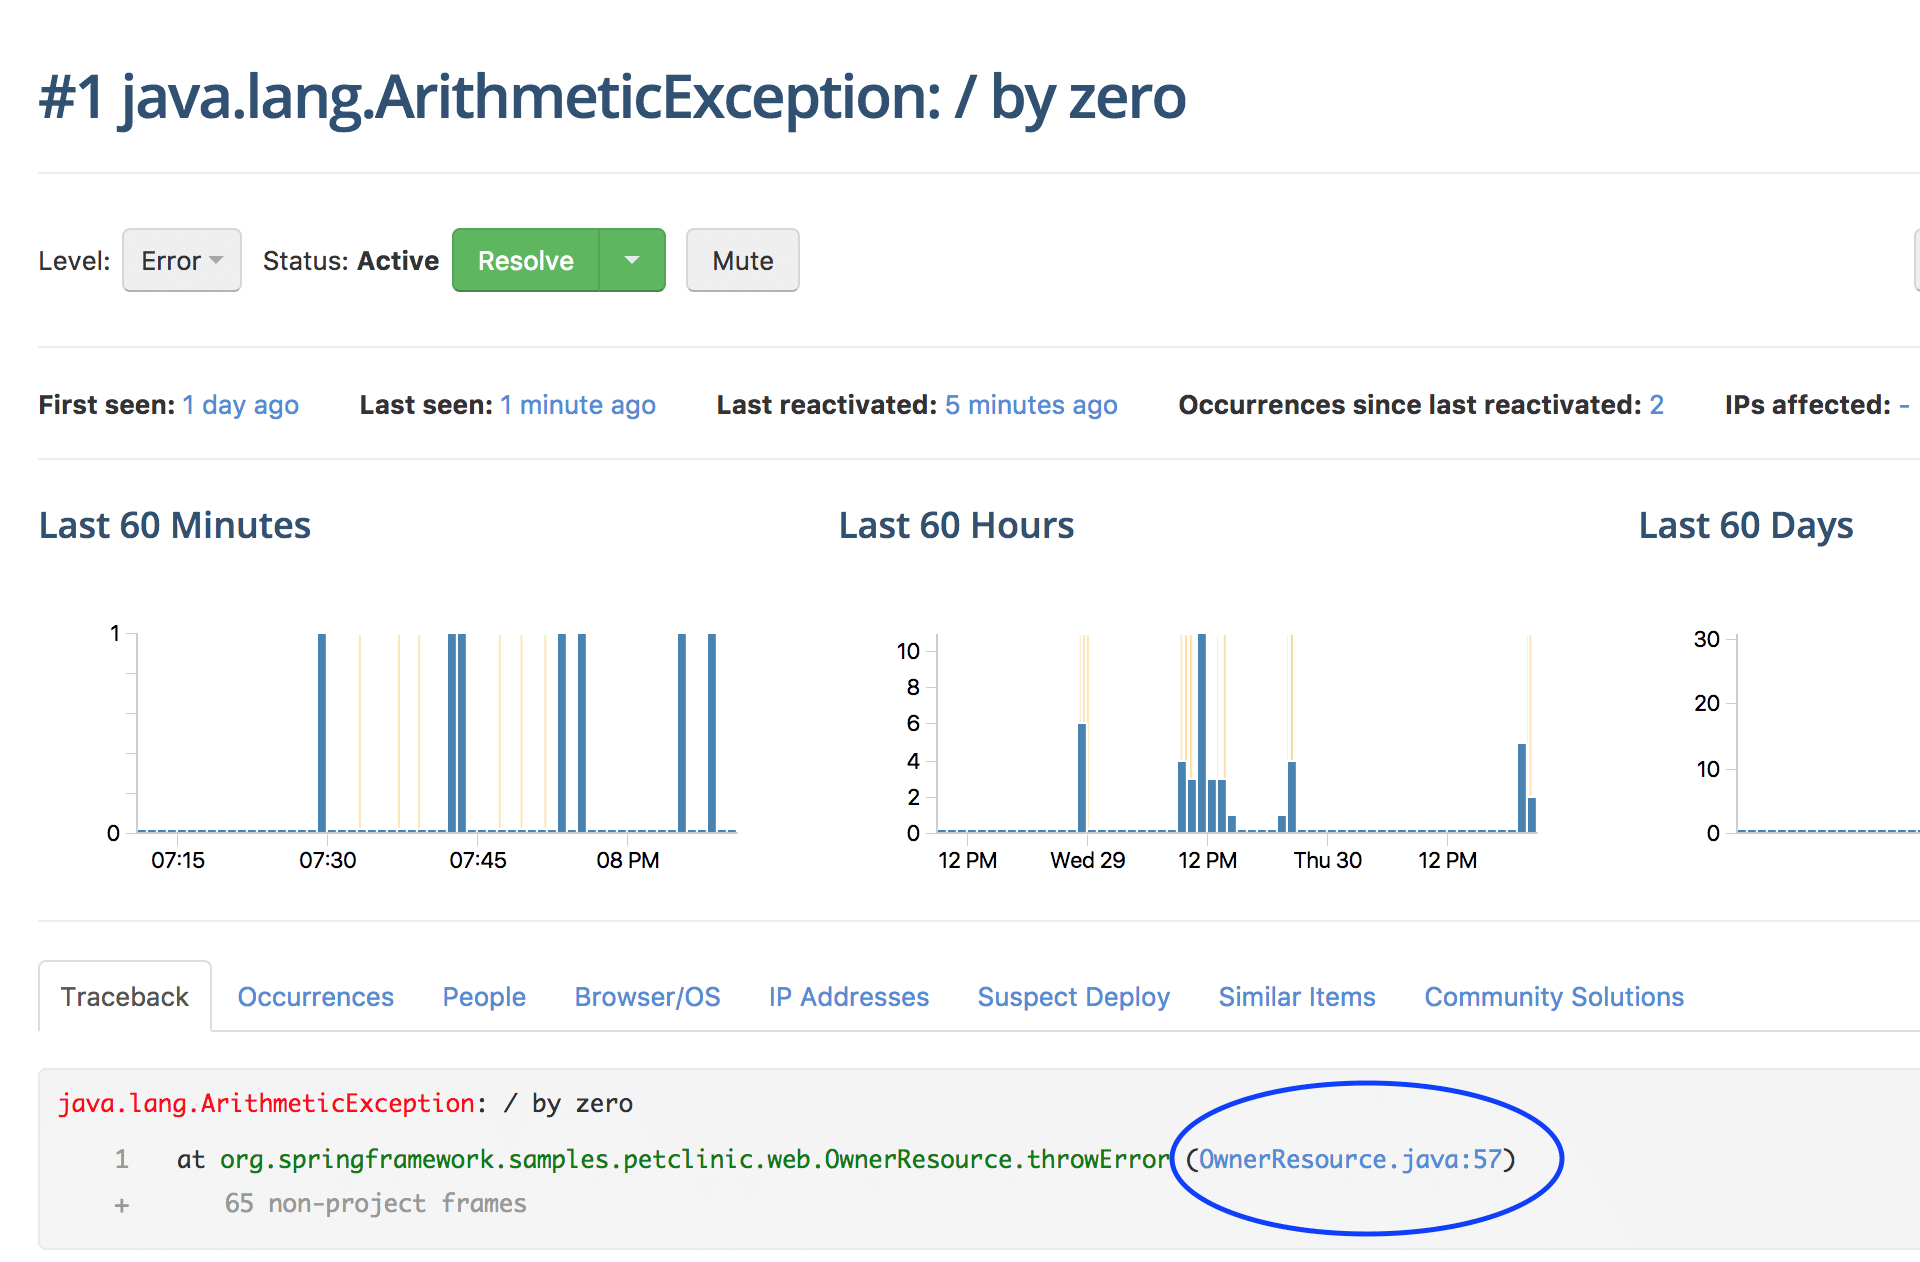
When you click on the link it will directly open the class in the bitbucket repository and highlight the suspected piece of the code, depicted in the next screenshot:
A second way to find the root cause of errors is by using the Suspect Deploy tab. It shows the revision where the error was first observed, along with changes that were made to the code since the previous deployment. We can see the commit message indicating that an error code was introduced.
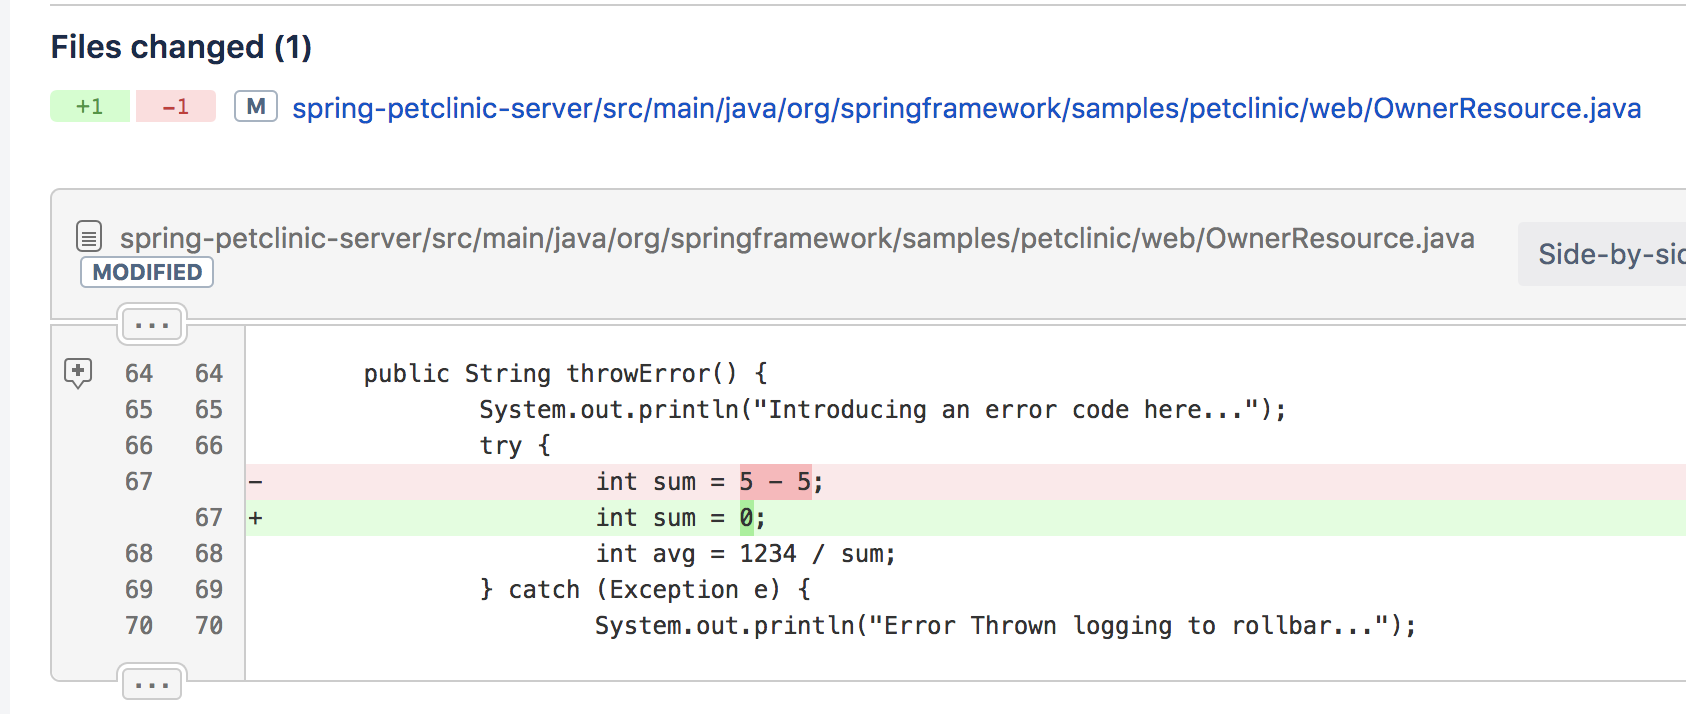
Clicking on the link with the revision signature shows us a diff where we can see an additional error was introduced. Both versions result in a divide by zero error. In a real-world scenario, this would tell us what change caused the error, who made it and when.
We have successfully generated an error, tracked the error with Rollbar, and identified the root cause of the problem quickly with Rollbar.
Conclusion
Rollbar helps you monitor production deployments and notifies you when new errors occur. It can trace errors, then pinpoint the suspected deployment and code version. This will help you troubleshoot errors faster because you can quickly see what change caused it, when, and by whom. This will help you quickly identify and fix errors before they affect more customers.
Now that you understand how to configure Jenkins with Rollbar, try setting up your own application.


